Email Accounts
Your website and your email are separate things. So if you already have email accounts being provided – by your domain registrar for instance – you do not need to change.
If you prefer to have them with us, you just need to tell us the name(s) you need for the account(s) e.g. [email protected] or [email protected], and we’ll take care of the rest.
After that, whenever you need to add or delete email accounts, just let us know.
Number of Email Accounts
We include 3 email accounts with our websites. However, let us know if you require more accounts and we’ll add more for you at a very small monthly cost.
How to Set Up Your Mailbox
There are two ways to access your mailbox – either by WebMail i.e. through your web browser, or using an email client program like Mac Mail, Outlook, Gmail, etc.
1. If you are using WebMail
WebMail allows you to access, send, receive and manage your email through a web browser. You can access your email from anywhere, as long as you have an Internet connection and a web browser.
Go to mail.hostedemail.com and enter the Email Address and the Password that will have been assigned to you.
Once you have logged in, feel free to change the password in the Settings section.
2. If you are using an email program (Mail, Outlook, etc.)
Setting up your email on Microsoft Outlook
Note: the screenshots below were taken from the Mac version of Outlook, but the Windows steps are similar.
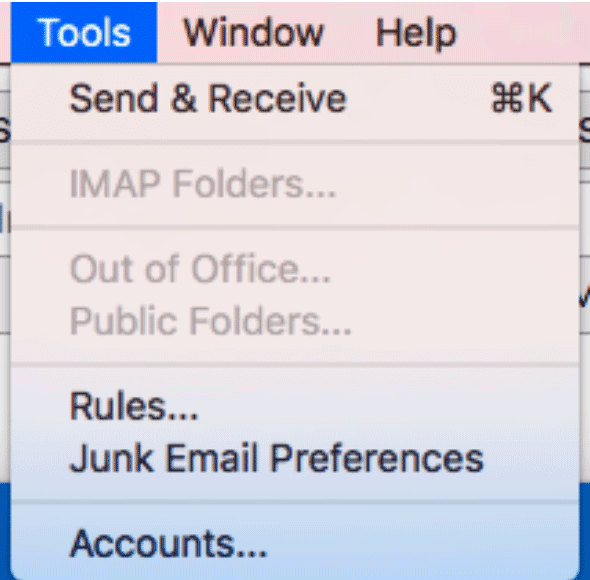
1. Open Outlook. From the Tools menu, choose Accounts.
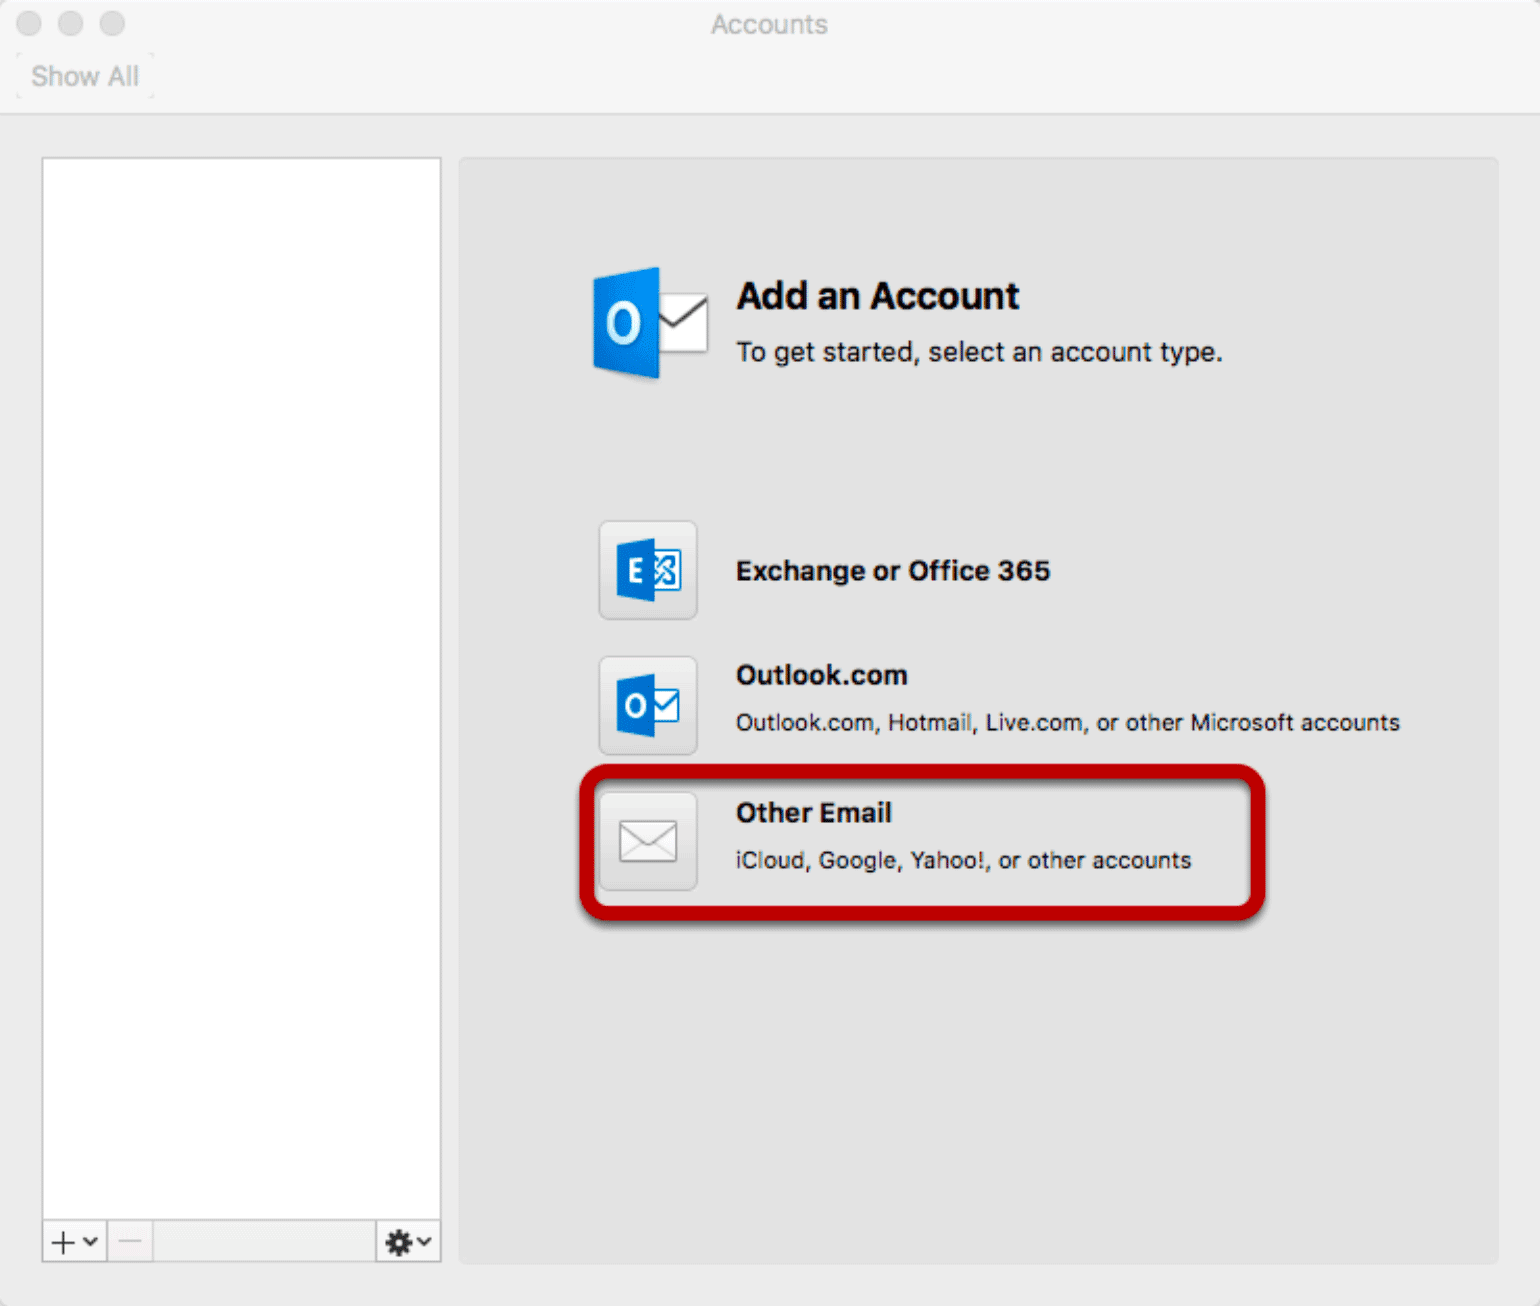
2. Select Other Email:
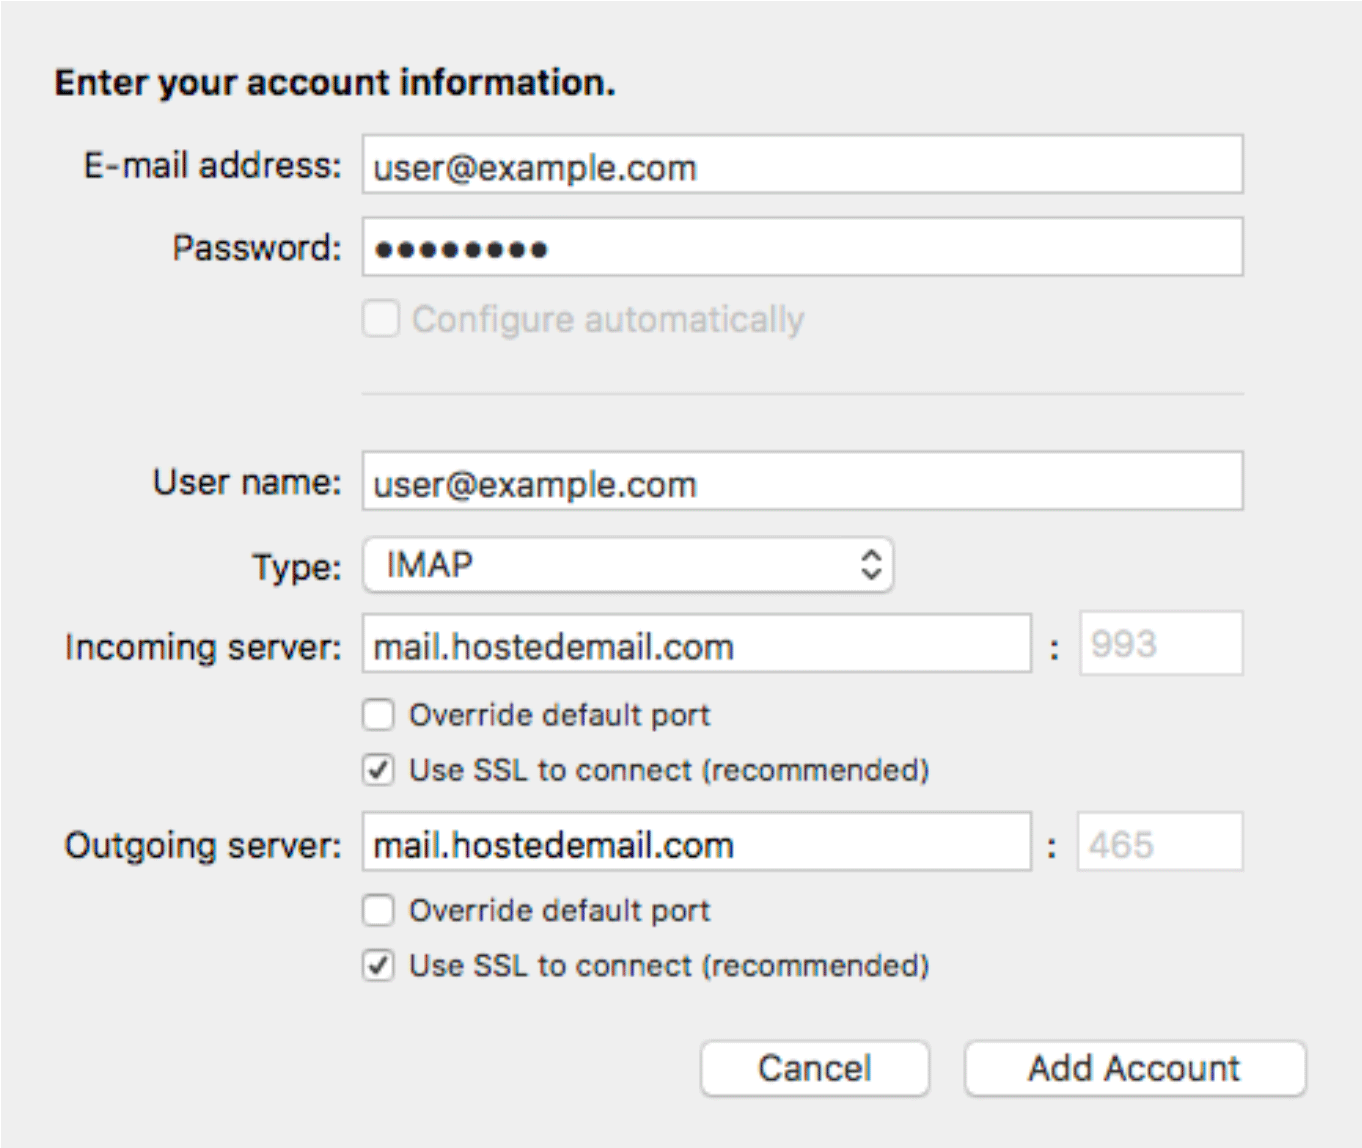
3. Enter your email settings as follows, and then click Add Account.
- E-mail address: enter your new email address
- Password: enter your new email password
- User name: enter your new email address
- Type: IMAP (Note: POP3 is also supported by our mail server. We recommend IMAP but you can select POP3 if you prefer.)
- Incoming server: mail.hostedemail.com
- Use SSL to connect (recommended) needs to be checked
- Outgoing server: mail.hostedemail.com
- Put a check next to Override default port and also put a check next to Use SSL to connect (recommended). Next, change the port number from 25 to 465.
Setting up your email on Mac Mail
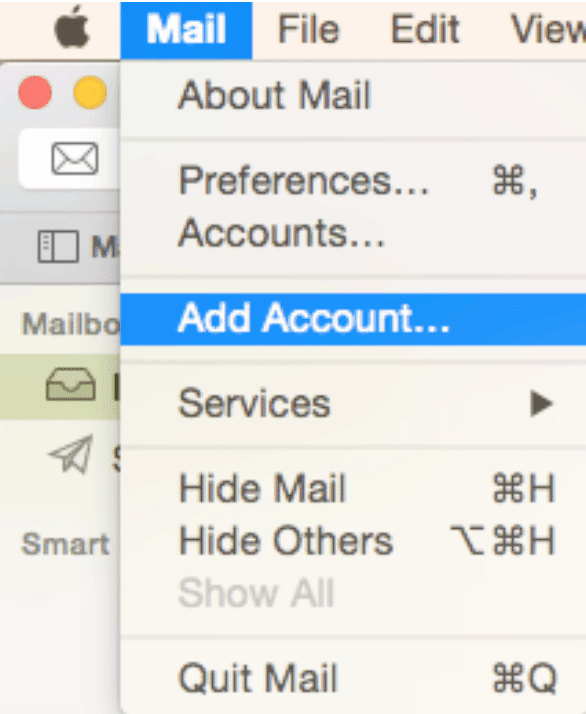
1: Launch Mac Mail, click on Mail and then select Add Account.
2: Choose Add Other Mail Account and click Continue.

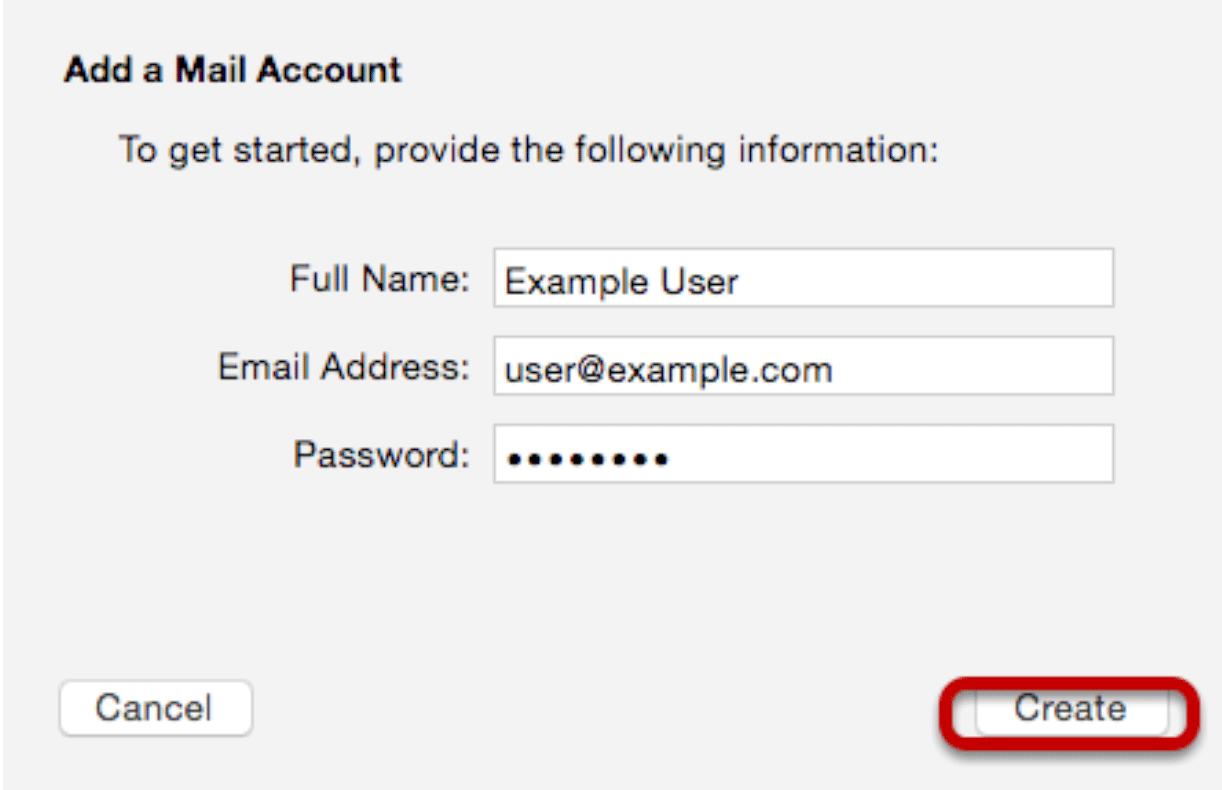
3: Enter the following information:
- Full Name: the name that will appear on all outgoing mail from this account.
- Email Address: the full email address of your account.
- Password: the password of your email account.
Then click Create.
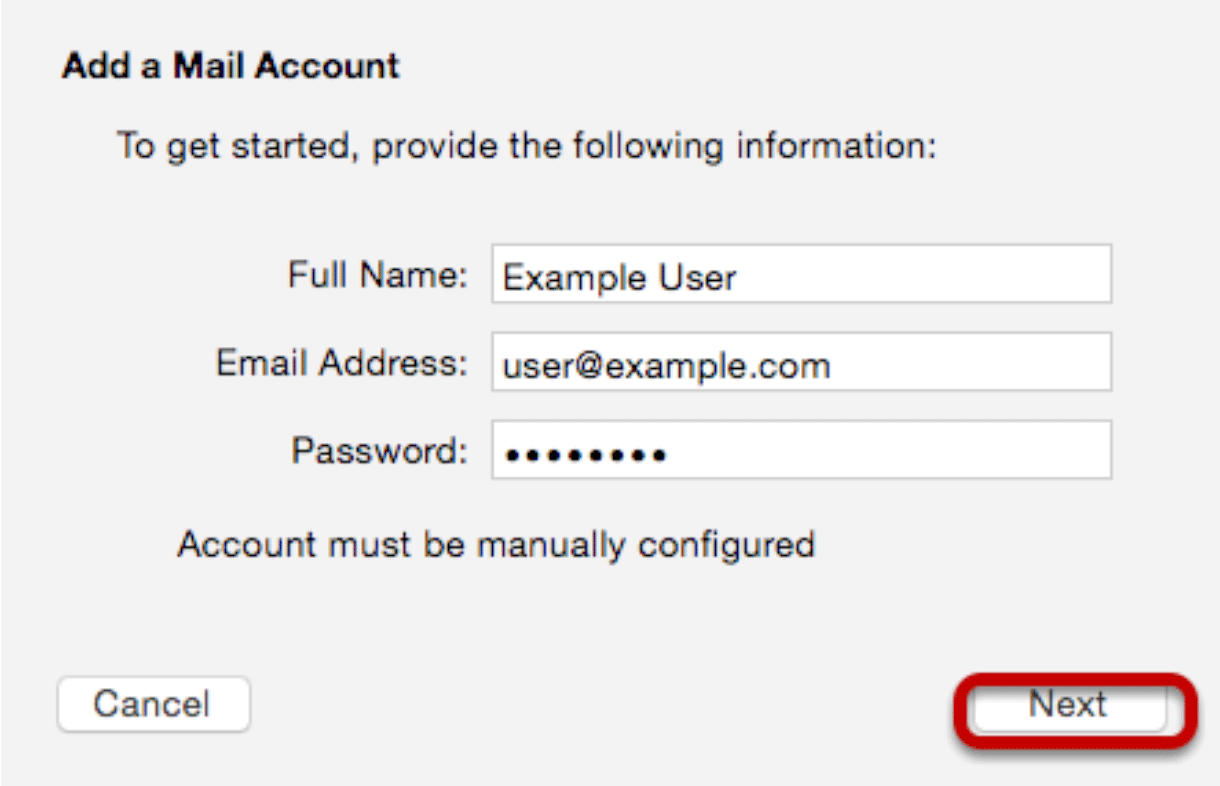
4: The system will prompt you that manual account configuration is required. Click Next.
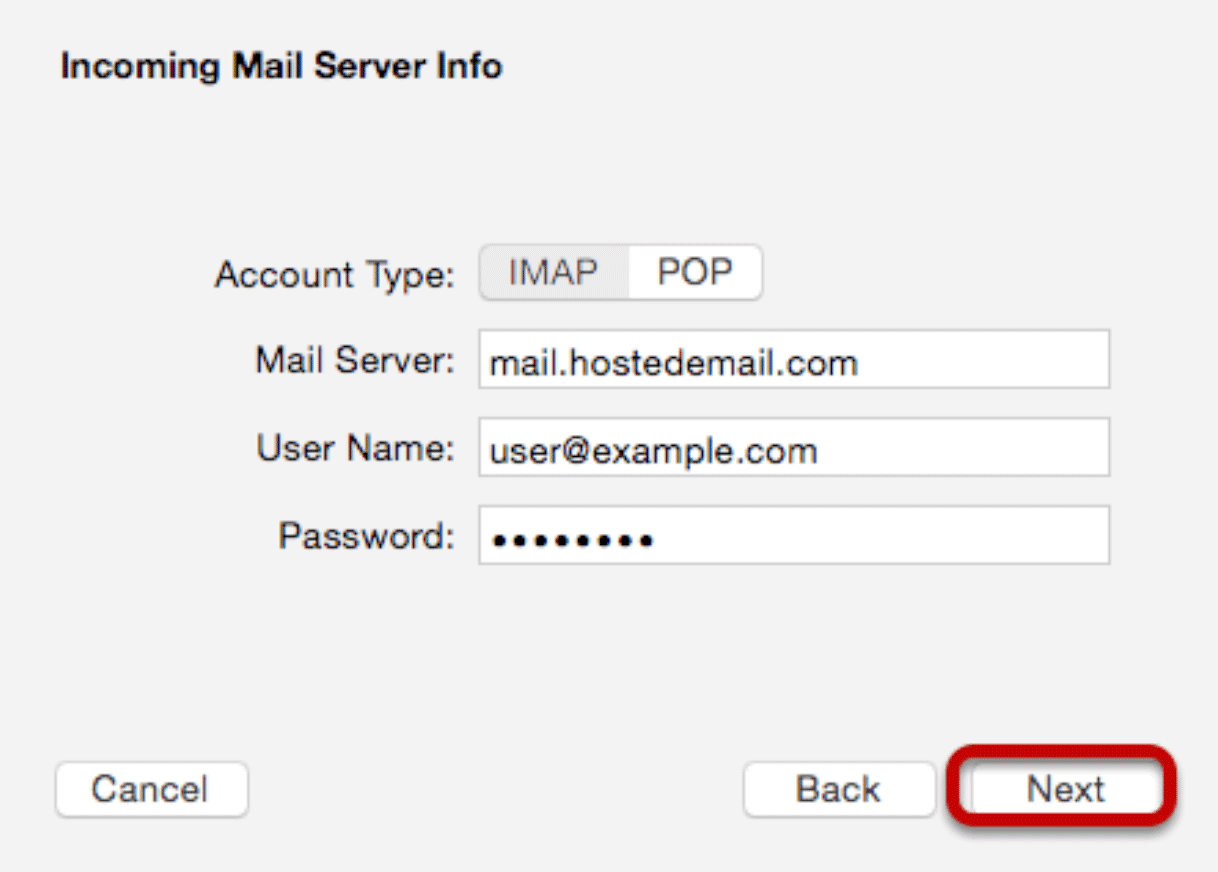
5: Enter Incoming Mail Server Information
- Account Type: we recommend IMAP.
- Mail Server: mail.hostedemail.com
- User Name: your full email address.
- Password: your email account password.
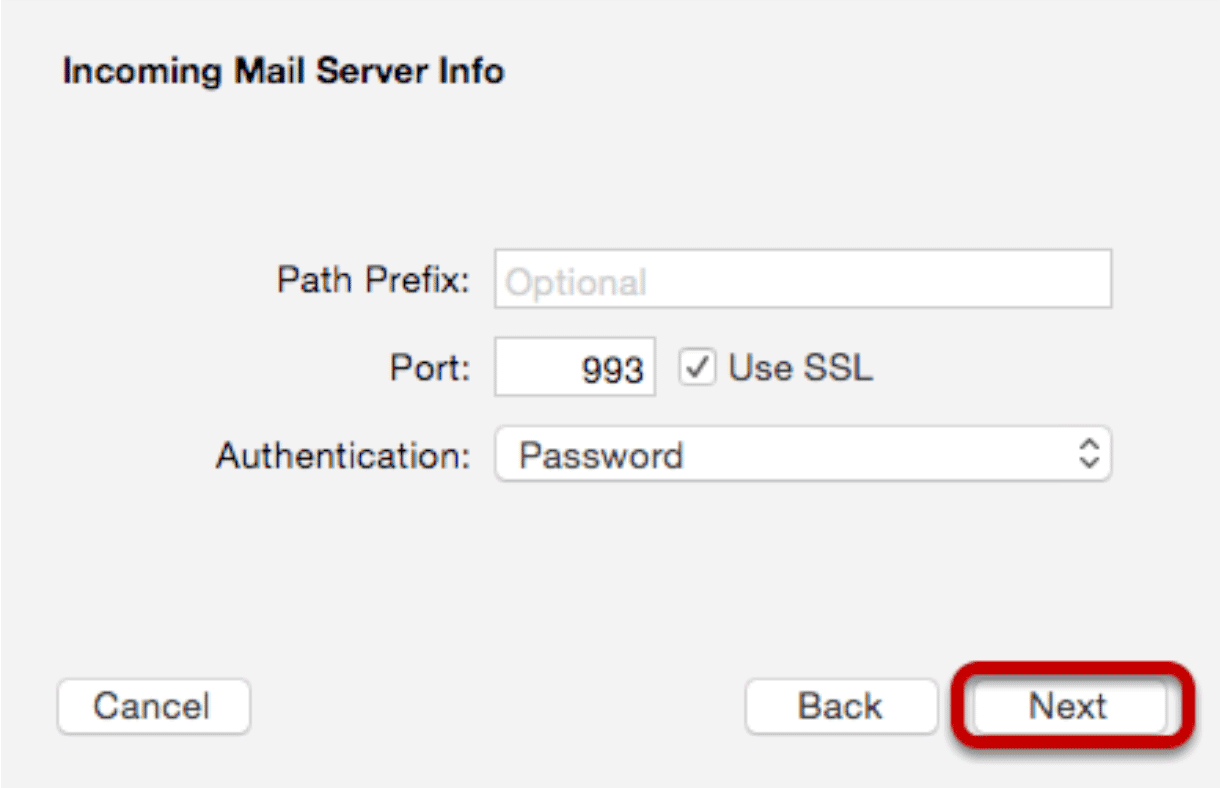
6: Enter Incoming Server Port Information
Port: 993 (IMAP) or 995 (POP)
Click Next.
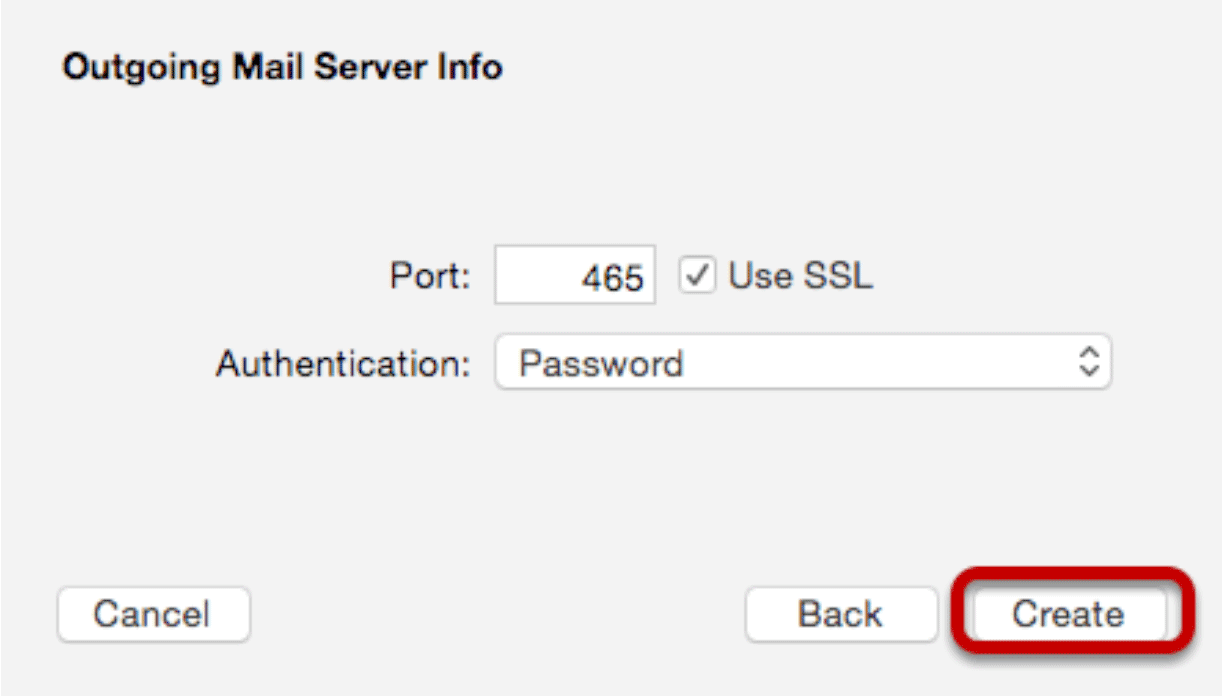
7: Enter Outgoing Mail Server Information
- SMTP Server: mail.hostedemail.com
- User Name: your full email address.
- Password: your email account password.
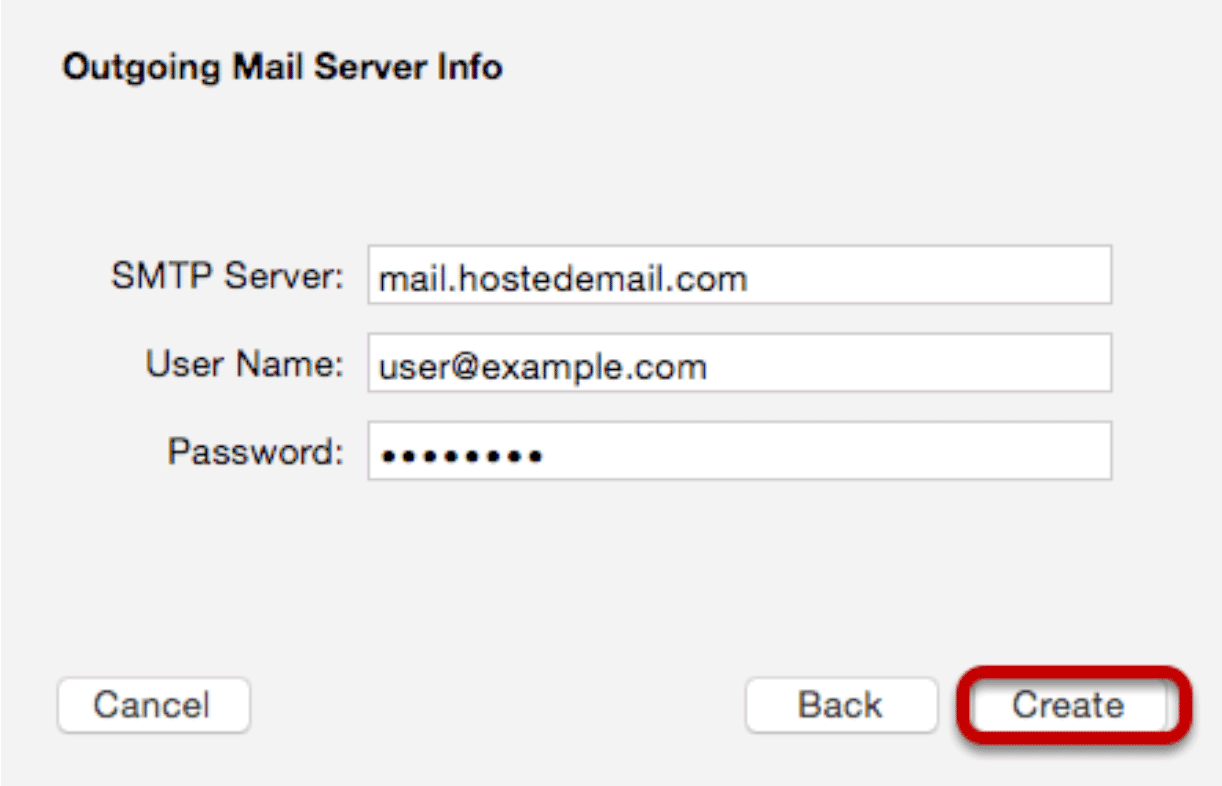
Port: 465
Click Create.
Setting up your email on iPhone
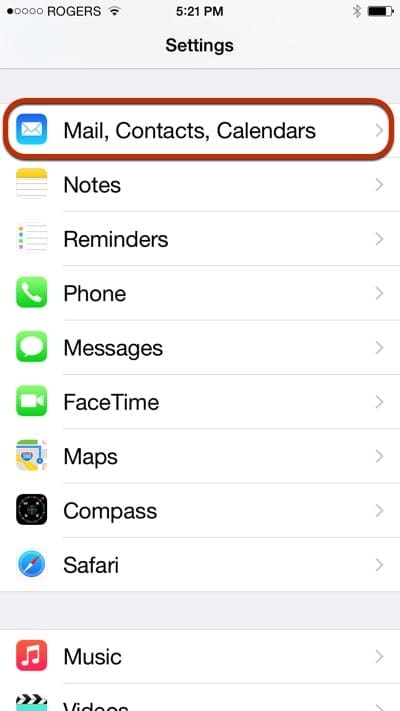
1. Tap Settings on your home screen.
![]()
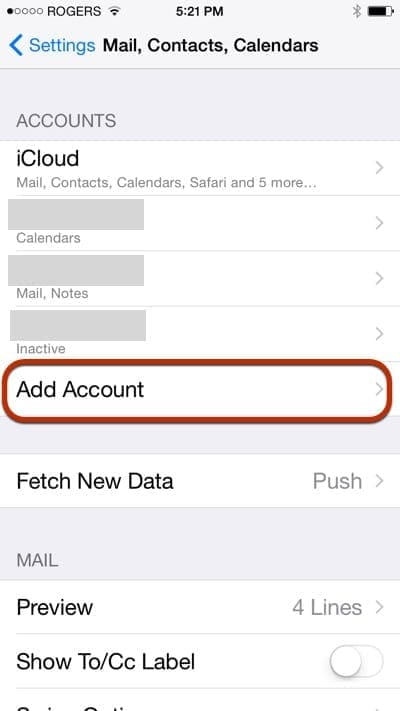
2. Scroll down and tap Mail, Contacts, Calendars.
3. Tap the Add Account option.
4. Tap Other.

5. Tap Add Mail Account.
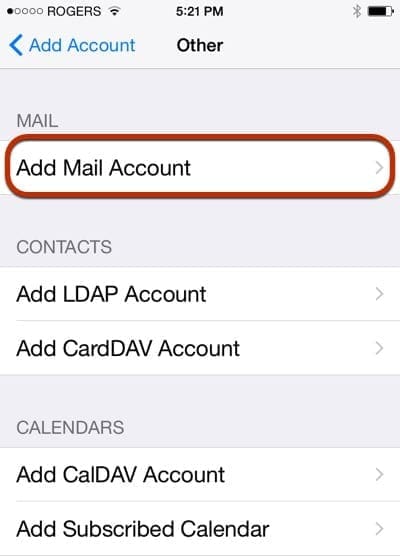
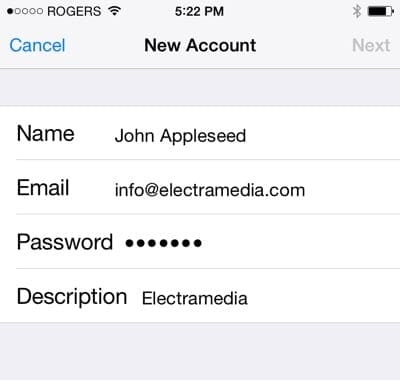
6. Enter the following settings:
- Name: Enter your name as you wish it to appear when you send email.
- Address: Enter your full email address.
- Password: Enter your email password.
- Description: This will be used to identify this email account on your iPhone.
Tap Next.
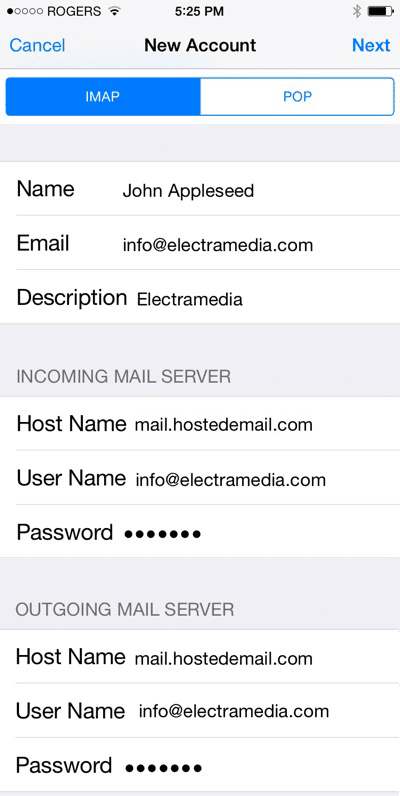
7. Our email service supports both IMAP and POP. But only use IMAP for all your mail services.
Under the Incoming Mail Server section, enter the following settings.
- Host Name: enter mail.hostedemail.com
- User Name: enter your full email address.
- Password: enter your email password.
Scroll down to the Outgoing Mail Server section.
- Under the Outgoing Mail Server section, enter the following settings:
- Host Name: enter mail.hostedemail.com
- User Name: enter your full email address.
- Password: enter your email password.
Tap Next.
Your device will now verify your email account settings. Be patient, as this may take several minutes.
If you receive an error indicating that you “Cannot Connect Using SSL” then tap Yes to continue without SSL.
Tap Save.
You can go back into settings and update the SSL settings for your incoming settings which should be set to Server Port 993 and the outgoing server should be set to Server Port 465. If this is something you are having difficulting doing, then please consult your iPhone store or your IT professional.
Troubleshooting: If you receive an error indicating that you “Cannot Connect” to your mail server or send emails, please try the following steps.
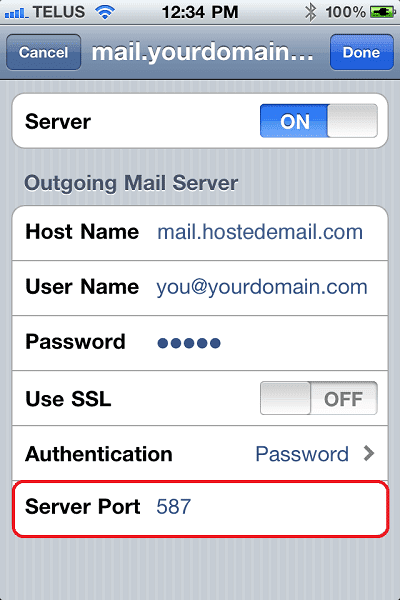
1. Depending on you wireless phone provider, your outgoing Mail Server Port may need to be changed to either 587 or 465.
Tap ‘SMTP’.
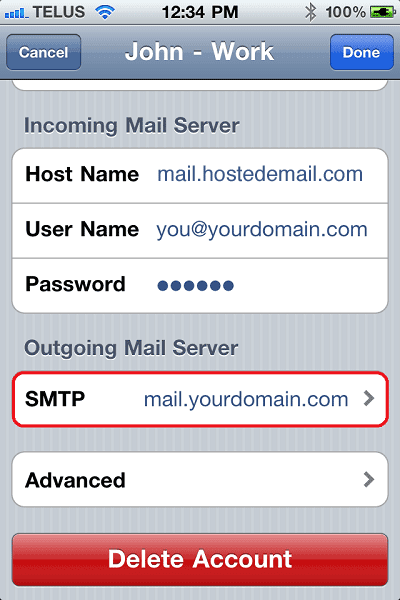
2. Tap ‘mail.yourdomain.com’
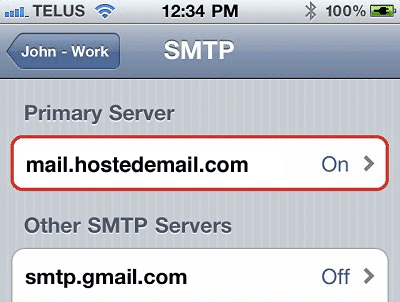
3. Enter either 587 or 465. Tap ‘Done‘.
4. If neither of the ports allow you to send emails, please try powering down your iPhone and restarting after a few minutes.
Setting up your email on Android
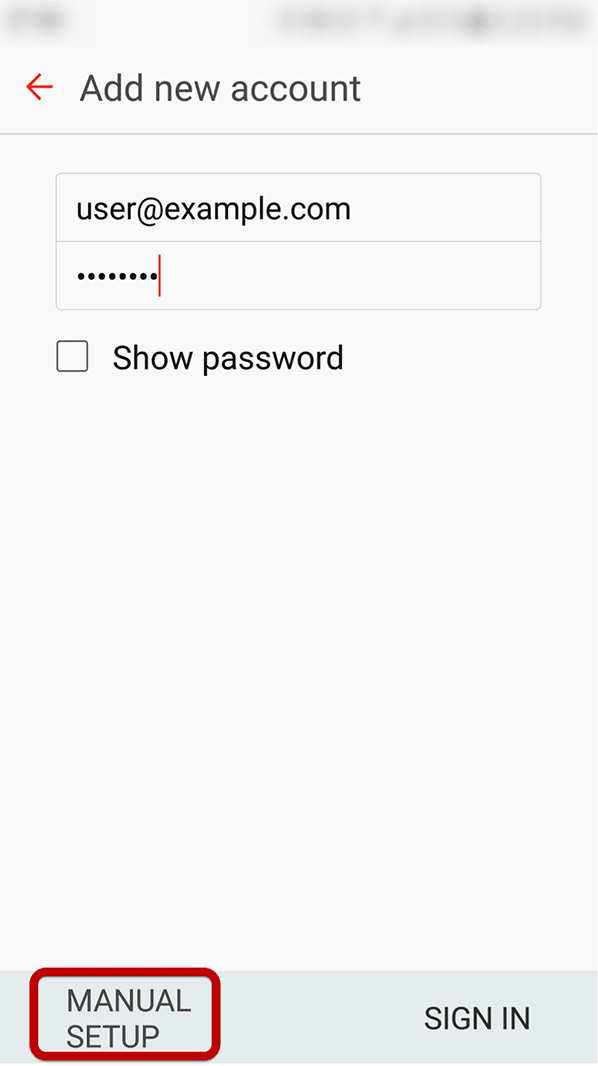
1. Open the Email application. Enter your email address and select Manual Setup.
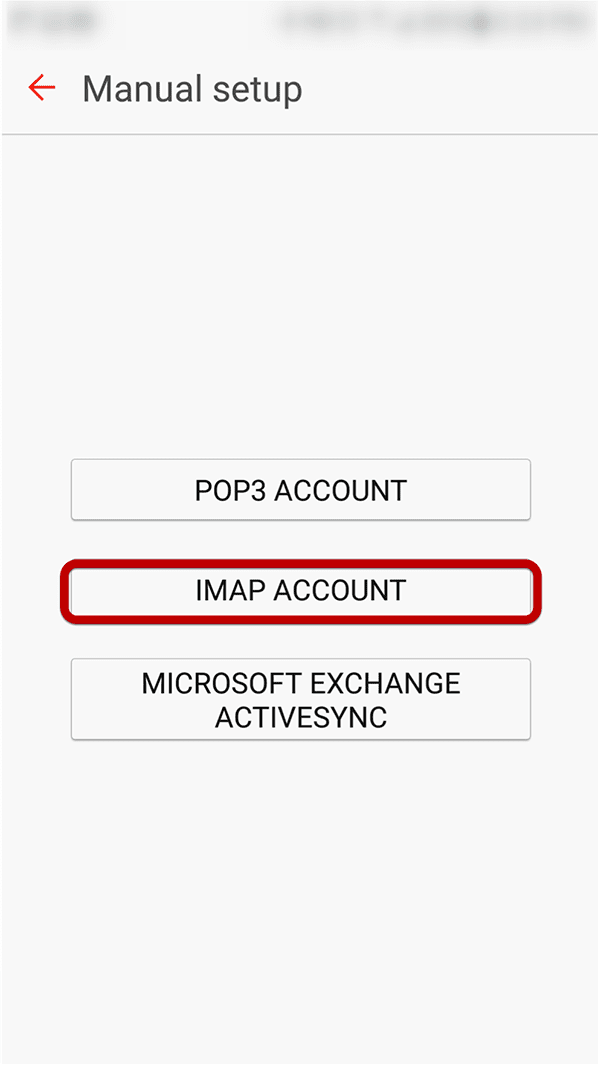
2. Select IMAP Account.
3: Enter Incoming Account Settings:
- Username: The email address should already be filled in using the address you entered earlier.
- Password: The password should already be filled in using the password that you entered earlier.
- IMAP server: mail.hostedemail.com
- Port: 993

4. Enter Outgoing Server Settings:
- SMTP server: mail.hostedemail.com
- Security type: SSL / TLS
- Port: 465
- Require sign-in needs to be checked (it is checked by default)
- Username: your username
- Password: your password
Click Sign In to complete the setup process.
This page from our email provider contains links to documents with specific instructions for all popular email programs.
Frequently Asked Questions:
How do I receive emails from my website’s contact form?
Typically, websites have online forms e.g. a Contact Form where people can enter their information – similar to the Support Email Form you see on this page.
When we build your website, we will set up those forms for you, and set it to send the submissions to the email address(es) of your preference.
Those emails will also be stored in your website’s database. To access them:
- Login to your website’s Admin interface.
- Select Forminator Pro > Submissions on the left column.
- Select your form and click Show Submissions.
You’ll be able to look at individual submissions, export them as a .csv (Excel) file and more.
I’m having problems sending/receiving emails
- If we are supplying your email check the status of the email service at opensrsstatus.com.
- Always check your webmail first through https://mail.hostedmail.com. If you can send and receive with webmail then it’s an email client issue.
- Check your email client settings as per above.
- Your mailbox might be full, see below.
- Check your DNS settings to make sure it is still connected to our email service.
My mailbox is full. How do I get more space?
Email messages are stored in the cloud, so you can access them from any of your devices – computer, tablets, mobile. Our email accounts have a generous limit, but eventually they may become full. Even unwanted email messages occupy space.
To fix that, delete old/unnecessary emails by moving them from the cloud into your local system.
Mac:
- Open the Mail program.
- Click Mailbox in the Menu bar.
- Click New Mailbox.
- Click the drop-down next to location to choose where to set up your new mailbox folder.
- Click on an email account to choose where your mailbox will go. You can choose from any of your existing email accounts.
- Select On My Mac – you only want this mailbox on your Mac.
- Name your mailbox e.g. “Old Inbox”.
- Click OK.
- Your new folder will be located under the name of the email account into which you placed it in the Sidebar.
- Now drag the unwanted messages – old messages that you don’t need anymore, all spam, etc. – from your regular folder to the new one. This will remove them from the cloud, thus freeing up space.
Outlook:
- From the Inbox, select New Items > More Items > Outlook Data File.
- Enter a File name.
- To add a password, check the Add Optional Password box.
- Select OK. Type a password in both the Password and Verify Password text boxes and select OK again.If you set a password, you must enter it every time that the data file is opened — for example, when Outlook starts or when you open the data file in Outlook.
For more information, please refer to this support article from Microsoft.
The emails I send out are often being marked as Junk by the recipients.
If your emails are being sent directly the recipients’ Junk folder, adding a record to your your domain may fix the problem. If you have your domain name registered with us, we can make the change for you. If not, add a new record to your domain through your domain registrar, or get them to make this change for you:
- Type: TXT
- Name: your domain name
- Content: v=spf1 include:_spf.hostedemail.com ~all
- Proxy Status: DNS only
Allow at least 1 hour the DNS changes to propagate.
Can’t Send or Receive Emails at the Moment?
It could be that our email provider is experiencing a technical issue.
To check the status, go to https://www.opensrsstatus.com